Thursday, October 28, 2010


Ubuntu 10.10 "Maverick Meerkat"
Ubuntu Linux ramping dan cerdas gulungan keluar tanda baru
keluaran - dengan banyak alat yang kuat untuk rumah dan
perniagaan. Versi 10.10 merangkumi ciri-ciri baru untuk mencipta
dan menguruskan awan gambar, serta baru
Gnome desktop dan update ke Pusat Perisian. The
Pengurus foto Shotwell menyertai koleksi yang komprehensif
alat desktop. tambahan lain termasuk kemas kini
untuk Evolusi, Ubuntu Seorang pengurus muzik, dan
aplikasi rangkaian sosial Gwibber. Sebuah pilihan boot Live
membolehkan anda cuba disk tanpa risiko tatarajah yang ada

How to Fix VirtualBox USB Support

How to Fix VirtualBox USB Support


Adjust text size:

May 15th, 2009, 10:19 GMT| By Marius Nestor


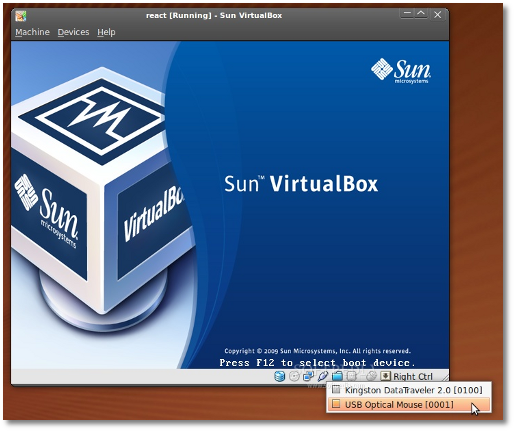
VirtualBox with USB support enabled
Enlarge picture
It is actually a known fact that there
is an issue with VirtualBox and the attached USB devices that many of us are trying to use in the virtual machine. Here is a real-life example:

I am a 100% Linux user and I have a photo printer that Linux can't recognize. Let's say that I want to print some photos quickly, to give them to someone. I have a Windows installation in a virtual machine just for this reason (sad, I know) and I want to access my printer, which is connected via a USB port. To my surprise, I can see the printer in the USB device list of VirtualBox, but I can't access it (very frustrating). Firing up Firefox and searching on Google for a fix takes too long, because there are many old tutorials that teach you how to modify various files or change permissions, etc. What to do? Well, below is the answer to the endless VirtualBox – USB issue (and it's pretty damn simple too!).

This tutorial was created mostly for my needs, but I am sure that many of you will find it very helpful. Ready?

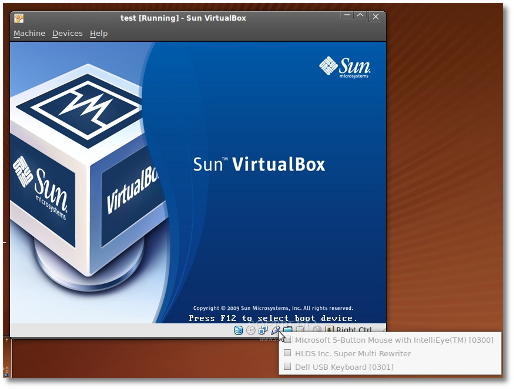
This is how a default installation of VirtualBox in Ubuntu 9.04 shows the USB devices, and we need to fix it.

Review image


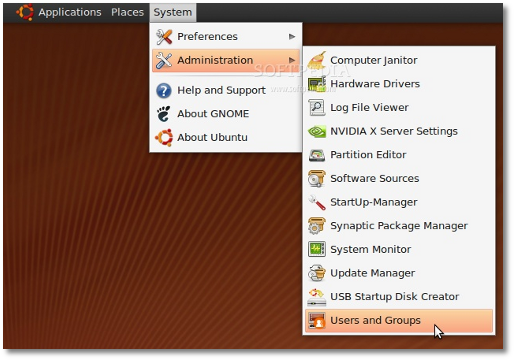
Go to System -> Administration -> Users and Groups...

Review image


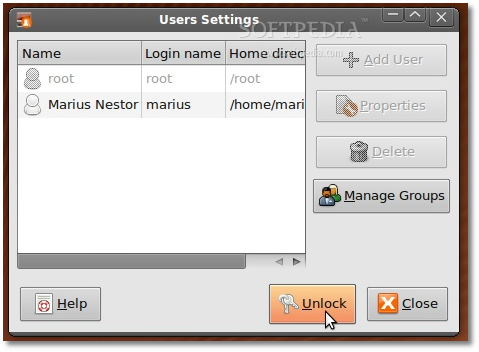
Click the "Unlock" button...

Review image


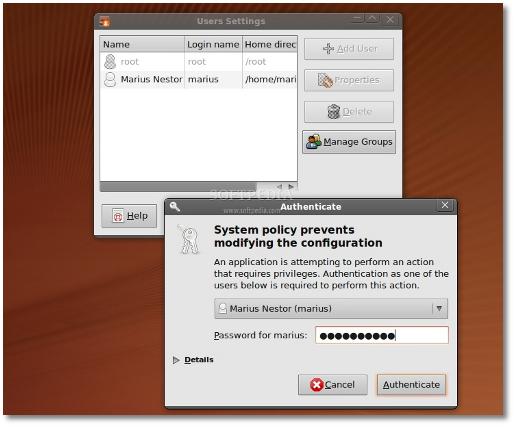
Type your password and click the "Authenticate" button....

Review image


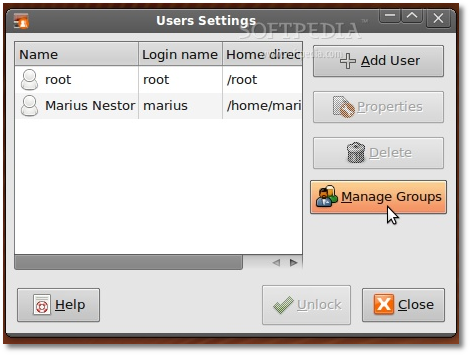
Click on the "Manage Groups" button...

Review image


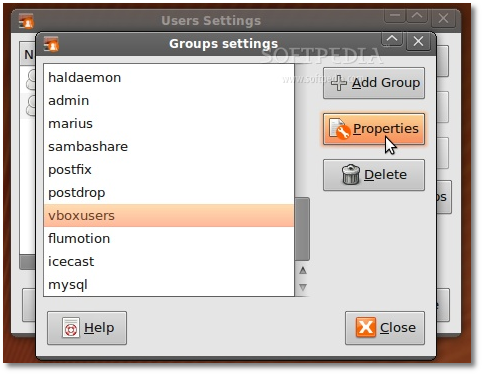
In the "Groups settings" window that will appear, scroll down until you see the vboxusers entry. Select it and then click on the "Properties" button...

Review image


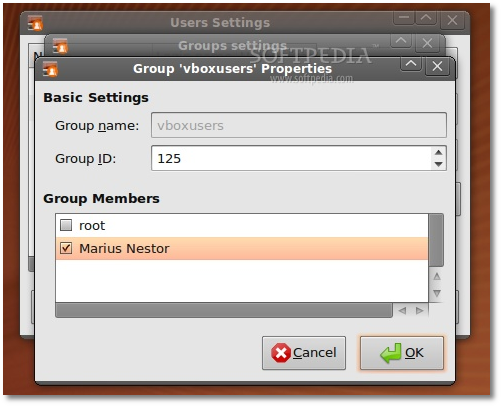
Another window will appear, called "Group 'vboxusers' Properties. Just check the box in front of your username and click the "OK" button when you're done...

Review image


Close the "Group settings" and "Users Settings" windows and log out. Log in and open up VirtualBox, start your virtual machine and you will see that you can now access the USB devices!

Review image

Thursday, October 7, 2010

System Pengurusan Cyber Cafe Linux

p/s: untuk rujukan sendiri


Selepas hampir setahun di uji oleh saudara cham_aragon untuk kegunaan cc Projek Bestari Terengganu, dirasakan sudah sampai masanya kami release ospcc untuk publik.

OSPCC atau kami gelar sebagai system pengurusan cyber cafe adalah merupakan ubahsuaian projek cclfox oleh Bruno Deferrari. Kami cuma mengubahsuai ia agar sesuai untuk kegunaan tempatan dengan semangat open source.

Anda boleh mencuba dengan memuat turun package ospcc.tar.gz dari section download.

Untuk install, anda perlukan sqlite3 dan libfox1.4 .

# apt-get install sqlite3 libfox1.4


Untuk install pada server, ekstrak package dan masuk ke subfolder server dan install package berikut:
# dpkg -i libccls_0.7.0-1_i386.deb ospcc-server_0.7.0-1_i386.deb

Kemudian bina direktory berikut pada home server:
mkdir ~/.ospcc


OSPCC perlukan certificate ssl. Anda boleh gunakan certificate yang datang dengan package atau pun bina sendiri certificate. Certificate yang datang dengan package sah sehingga 1 Dis. 2008. Script untuk membina certificate juga disediakan.
Apa yang perlu anda lakukan ialah copy certificate dalam subfolder "pem" ke folder .ospcc yang kita bina tadi.
 cp *pem ~/.ospcc


Untuk run server, anda boleh gunakan arahan berikut:
 ospcc &


Pada client pula, ekstrak package tadi dan masuk ke subfolder client/Debian dan install package di dalamnya:
 dpkg -i libcclc_0.7.0-1_i386.deb ospcc-client_0.7.0-1_i386.deb

Client juga perlukan certificate yang sama dengan server. Untuk itu, kita perlu bina direktory .cclcfox:
mkdir ~/.cclcfox


Kemudian salin certificate dari subfolder pem.
cp *pem ~/.cclcfox


Untuk run client, guna rahan berikut:
cclcfox -host "ipserver" -name "nama-client"

contoh:
cclcfox -host 192.168.1.2 -name mambang


Pada server, anda perlu benarkan sesi untuk client dengan nama tersebut.

Screenshot ospcc server:


Screenshot screen lock pada client


Screenshot timer pada client


Maklumat detail cara install dan bagaimana membina autostart ada pada file Baca-saya.txt.

Selamat mencuba.